A Detailed look into the Node.js HTTP module
Node.js HTTP module is a built-in library that allows developers to create web servers, as well as communicate with other APIs using HTTP 1.1, HTTP 2, and HTTPS.

Architecture
The HTTP module extends two built-in classes:
- Net module
Provides network API for creating stream-based TCP servers or clients. - Events module
Provides an event-driven architecture usingEventEmitterclass.
This means that when working with an HTTP module, you can listen and act upon the events, while the data is processed using streams.
Both of these work in a non-blocking manner, meaning the HTTP module won’t pause while processing multiple API requests simultaneously.
Simple Server
To get started, create a JavaScript file on your machine (e.g. app.js) and import the HTTP module.
const http = require('http');Then create a server instance using http.createServer() function.
const server = http.createServer((req, res) => { ... });The function takes two arguments:
- request object (req)
- response object (res)
Both arguments are stream objects.
After creating a server, set a response in the handler (callback function).
const server = http.createServer((req, res) => {
  res.end('Hello!');
});
The last thing to do is to set up a port on which this server will run. You can do that by calling server.listen() and passing any valid port number:
const server = http.createServer((req, res) => {
  res.end('Hello!');
});

server.listen(3000, () => {
  console.log('Server started on localhost:3000!');
})
If you run this file (using node app.js), you should see a messageServer started on localhost:3000! printed in the console.
Open a web browser, head over to localhost:3000 and you should see the response from the server displayed in the browser:

The response will always be the same regardless of the route you visit.

Request
The Request object is an instance of http.IncomingMessage that extends readable stream and contains information on the incoming client data, such as:
- request URL
- request method (GET/POST/PUT/DELETE)
- request body
- request headers, etc.
Extract data from the URL
To pick up other information like the request path, or query you’ll have to do some extra work.
You can see request URL information doing the following:
const server = http.createServer((req, res) => {
  console.log('Request Headers :>> ', req.headers);
  console.log('Request Method :>> ', req.method);
  console.log('Request URL :>> ', req.url);
  res.end('Thank you Mario, but our princess is in another castle...');
});
Now if you go to the route using curl or in a browser http://localhost:3000/api/users?userid=100, it should print this response in the console:
Request Headers :>>  {
  host: 'localhost:3000',
  connection: 'keep-alive',
  'cache-control': 'max-age=0',
  ...
}
Request Method :>>  GET
Request URL :>>  /api/users?userid=100
To extract the query you’ll have to make use of the URL module.
The URL module will parse the request URL to a JavaScript object.
const http = require('http');
const url = require('url');

const server = http.createServer((req, res) => {
  const urlData = url.parse(req.url, true);
  console.log('urlData :>> ', urlData);

  res.end('Thank you Mario, but our princess is in another castle...');
});
Now you can see more information on the request:
urlData :>>  Url {
  protocol: null,
  slashes: null,
  auth: null,
  host: null,
  port: null,
  hostname: null,
  hash: null,
  search: '?userid=100',
  query: [Object: null prototype] { userid: '100' },
  pathname: '/api/users',
  path: '/api/users?userid=100',
  href: '/api/users?userid=100'
}
From here it’s very easy to extract the query, body, search, pathname, and other parameters.
Extract Request Body
The incoming request body arrives through a stream. You can intercept it by subscribing to the data stream on the request object.
const server = http.createServer((req, res) => {

  req
    .on('data', (chunk) => {
      // data arrives in chunks
    })
Every time new a chunk arrives store it in a collection.
  const bodyStream = [];

  req
    .on('data', (chunk) => {
      bodyStream.push(chunk);
    })
Then listen to the end event that will fire when the whole data is finished processing.
  req
    .on('data', (chunk) => {
      bodyStream.push(chunk);
    })
    .on('end', () => {
      console.log('Request body collected!');
    });
Inside the end callback you concat all chunks as Buffer object and then parse the Buffer to the JavaScript object.
const server = http.createServer((req, res) => {

  const bodyStream = [];

  req
    .on('data', (chunk) => {
      bodyStream.push(chunk);
    })
    .on('end', () => {
      const bufferData = Buffer.concat(bodyStream);
      const requestBody =  JSON.parse(bufferData);

      console.log('Request Body :>> ',requestBody);
      res.end('All good!');
    });

    console.log('Hello World!');
});
If you make a POST request for localhost:3000 with Request Body:
{
    "name": "Super Mario",
    "level": 94,
    "job": "Plumber"
}
It should print the same object in the console:
Hello World!
Request Body :>>  { name: 'Super Mario', level: 94, job: 'Plumber' }
Notice how the ‘Hello World!’ was printed before the Request Body, even though I put console.log after subscribing to the events. That’s the proof that streams, even though they process data in chunks, do not block the program execution.
This is particularly useful when dealing with large files or when you want to process data in chunks rather than loading the entire payload into memory.
Response
The Response object is an instance of http.ServerResponse that extends a writable stream and is used to send the response to the client. Since it is a stream, you can send data in chunks (using res.write();):
const server = http.createServer((req, res) => {
  res.write('Hello');
  res.write('World');
  res.write('!');
  res.end();
});
Or all at once (using res.end()).
const server = http.createServer((req, res) => {
  res.end('Hello World!');
});
Keep in mind that you can call res.end() only once per request.
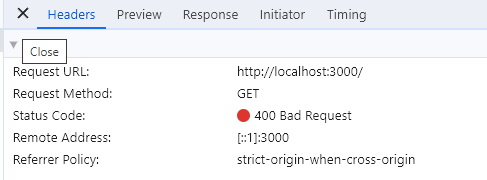
Status Code
The response object can also be used to set the HTTP response code
(The default status code is 200):
const server = http.createServer((req, res) => {
  res.statusCode = 400;
  res.end('Something went wrong!');
});
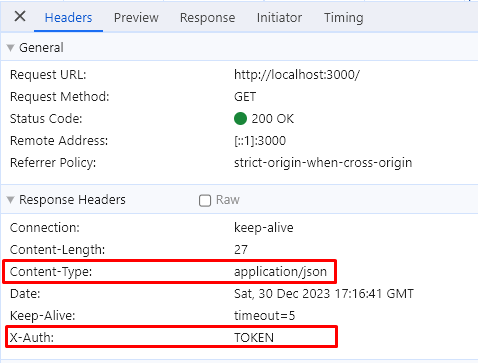
Response Headers
The Response object can also contain headers that will be useful to the client, such as:
- Authorization token
- Content-Type
- Content-Length (Total-Count),
- Various security headers, etc.
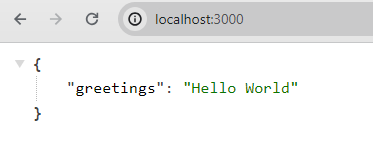
The Response object sends Content-Type text by default. If you want to send other types, like JSON, you need to specify it using headers:
const server = http.createServer((req, res) => {
  res.setHeader('Content-Type', 'application/json');
  // Very important: you must stringify the data before sending
  res.end(JSON.stringify({ greetings: 'Hello World' }));
});

server.listen(3000, () => {
  console.log('Server started on localhost:3000!');
})
You can set any other response header you desire:
const server = http.createServer((req, res) => {
  res.setHeader('Content-Type', 'application/json');
  res.setHeader('X-Auth', 'TOKEN');
  res.end(JSON.stringify({ greetings: 'Hello World' }));
});
You can also set headers like this:
const server = http.createServer((req, res) => {
  res.setHeader('X-Auth', 'TOKEN');
  // this header is tied to the status code
  res.writeHead(201, { 'Content-Type': 'text/plain' });
  res.end('Created!');
});
Error Handling
To handle errors in the HTTP module you can listen to the error event on the request and response objects:
const http = require('http');

const server = http.createServer((req, res) => {

  req.on('error', (err) => {
    console.log('Request error occurred :>> ', err);
    res.statusCode = 400;
    return res.end('Bad Request!');
  })

  res.on('error', (err) => {
    console.log('Response error occurred :>> ', err);
    res.statusCode = 500;
    return res.end('Internal Server Error!');
  })

  res.end('All good!');
});

server.listen(3000, () => {
  console.log('Server started on localhost:3000!');
})
You can handle errors using the Try-Catch block:
const server = http.createServer((req, res) => {
  try {
    // ...

    res.end('All good!');
  } catch (err) {
    console.error('Request processing error:', err);
    res.statusCode = 500;
    res.end('Internal Server Error!');
  }
});
Backend frameworks like Express, Fastify or Nest.js, make use of an HTTP module under the hood to handle API requests.

The HTTP module does not have a built-in router. If you need to display different content per route you can make use of the Request object:
- Request Method
- Request URL (and URL module)
const server = http.createServer((req, res) => {
  res.setHeader('Content-Type', 'application/json');

  // GET default page
  if (req.url === '/') {
    const responseData = JSON.stringify({ greeting: 'Hello World' });
    res.write(responseData);
    res.end();
  }

  // GET profile page
  else if (req.url === '/profile') {
    const responseData = JSON.stringify({ data: 'Profile page!' });
    res.write(responseData);
    res.end();
  }

  // POST Create item
  else if (
    req.url === '/create' &&
    req.method === 'POST' &&
    req.headers['content-type'] === 'application/json'
  ) {
    // handle POST request like in Extract Request Body section
  }

  // if route is not set
  else {
    res.statusCode = 404;
    res.write('Page not found!');
    res.end();
  }

})
Creating a server like:
const http = require('http');

const server = http.createServer((req, res) => {
  res.end('Hello World!');
});

const PORT = 3000;
server.listen(PORT, () => {
  console.log(`Server is listening on port ${PORT}`);
});
And accessing it from a different domain, e.g. frontend web application will throw a CORS error.
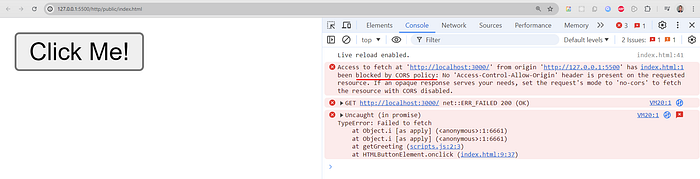
This is the default HTTP server behavior to block untrusted domains from retrieving resources from the server. In order for Node.js server to accept requests from other domains and web clients, the server must have CORS policy set up.
const http = require('http');

const server = http.createServer((req, res) => {
  // Set CORS headers
  res.setHeader('Access-Control-Allow-Origin', '*');
  res.setHeader('Access-Control-Allow-Methods', 'GET, POST, PUT, DELETE');
  res.setHeader('Access-Control-Allow-Headers', 'Content-Type, Authorization');

  // Handle preflight requests
  if (req.method === 'OPTIONS') {
    res.writeHead(200);
    res.end();
    return;
  }

  res.end('Hello World!');
});

const PORT = 3000;
server.listen(PORT, () => {
  console.log(`Server is listening on port ${PORT}`);
});- Access-Control-Allow-Origin header enables access for specified domains. The asterisk (*) means that any domain has access to the server.
- Access-Control-Allow-Methods header specifies the types of requests the server can serve.
- Access-Control-Allow-Headers header specifies what headers will server return that will not be blocked by CORS.
- A CORS preflight request is a CORS request that checks to see if the CORS protocol is understood and a server is aware using specific methods and headers.
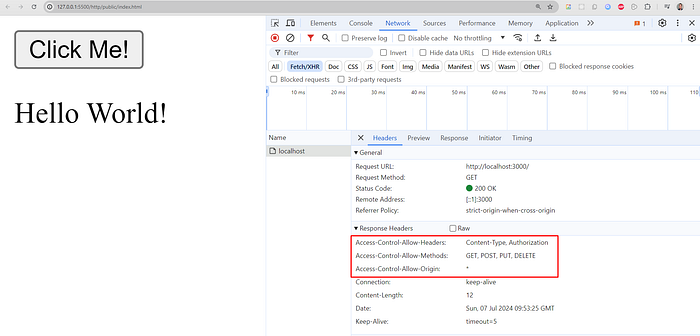
With this in place, the web client should be able to successfully connect to the server and receive the response.
<!DOCTYPE html>
<html lang="en">
  <head>
    <meta charset="UTF-8" />
    <meta name="viewport" content="width=device-width, initial-scale=1.0" />
    <title>Document</title>
  </head>
  <body>
    <button onclick="getGreeting()">Click Me!</button>
    <div style="margin-top: 15px" id="greeting"></div>

    <script>
      function getGreeting() {
        fetch('http://localhost:3000')
          .then((res) => res.text())
          .then((data) => {
            const element = document.getElementById('greeting');
            element.textContent = data;
          });
      }
    </script>
  </body>
</html>
Indeed it does. And there are the headers set on the server.

HTTPS protocol is used to encrypt communication between a client and a server (using TLS/SSL).
S protocol is used to encrypt communication between a client and a server (using TLS/SSL).
Prerequisites
To get started, you need to obtain an SSL certificate, either:
- self-signed or
- trusted certificate
To generate a self-signed certificate do the following:
Windows
- First of all, download and install OpenSSL on your machine.
- Go to the directory where you installed it and open CMD there.
- Run the following commands:
openssl genpkey -algorithm RSA -out private-key.pem
openssl req -new -key private-key.pem -out csr.pem
openssl x509 -req -days 365 -in csr.pem -signkey private-key.pem -out certificate.pem
Unix
You can generate a certificate on UNIX using the openssl command:
openssl genpkey -algorithm RSA -out private-key.pem
openssl req -new -key private-key.pem -out csr.pem
openssl x509 -req -days 365 -in csr.pem -signkey private-key.pem -out certificate.pem
These commands generate a private key (private-key.pem), a certificate signing request (csr.pem), and a self-signed certificate (certificate.pem).
Creating HTTPS Server
This time around you’ll make use of the HTTPS module.
Start by loading the certificates:
const https = require('https');
const fs = require('fs');

// Load SSL/TLS key and certificate files
const privateKey = fs.readFileSync('path/to/private-key.pem', 'utf8');
const certificate = fs.readFileSync('path/to/certificate.pem', 'utf8');

const credentials = {
  key: privateKey,
  cert: certificate,
};
Then create a server instance:
// HTTPS server
const httpsServer = https.createServer(credentials, (req, res) => {
  res.writeHead(200, { 'Content-Type': 'text/plain' });
  res.end('Secure Hello World!');
});
And then listen to a port. The default port for the HTTPS server is 443:
// Start the HTTPS server on port 443
httpsServer.listen(443, () => {
  console.log('HTTPS server listening on port 443');
});
HTTP + HTTPS
You can run the two servers in conjunction to redirect traffic from HTTP (port 80) to HTTPS (port 443) protocol.
const http = require('http');
const https = require('https');
const fs = require('fs');

// ... load certificates for https

// HTTP server (optional, for redirection to HTTPS)
const httpServer = http.createServer((req, res) => {
  // Redirect all traffic from HTTP to HTTPS
  res.writeHead(301, { Location: `https://${req.headers.host}${req.url}` });
  res.end();
});

// HTTPS server
const httpsServer = https.createServer(credentials, (req, res) => {
  res.writeHead(200, { 'Content-Type': 'text/plain' });
  res.end('Secure Hello World!\n');
});

// Start the HTTP server on port 80 (for redirection)
httpServer.listen(80, () => {
  console.log('HTTP server listening on port 80');
});

// Start the HTTPS server on port 443
httpsServer.listen(443, () => {
  console.log('HTTPS server listening on port 443');
});
The HTTP 2 module provides an implementation of the HTTP/2 protocol.
Web Server
Start by creating a server:
const http2 = require('http2');

// HTTP2 is secure by default
const options = {
key: 'path-to-private-key.pem',
cert: 'path-to-public-cert.pem'
};

// Create and initialize the server
const server = http2.createServer(options);

server.on('stream', (stream, requestHeaders) => {
stream.respond({
 ':status': 200,
 'content-type': 'text/plain'
});

stream.write('Hello World!');
stream.end();

server.listen(3000, () => {
  console.log('Started server on port 3000');
});
Client Server
Now create a client that will communicate with the server:
let http2 = require('http2');

// Create the client
let client = http2.connect('http://localhost:3000');

// Create the request
let req = client.request({
    'path' : '/',
})

// Listen for incoming message
let str = '';
req.on('data',function(data){
    str+=data;
});

// When the message end log it out
req.on('end',function(){
    console.log(str);
})

// End the request
req.end();Credits: KungFuCodingTutorials

You can talk to other APIs as well using HTTP/HTTPS modules.
GET
The HTTP module also exposes the GET method that can be used to talk to external APIs from your Node.js application.
// using https because JSONPlaceholder is SSL secured
const https = require('https');

https.get('https://jsonplaceholder.typicode.com/todos/1', (res) => {...}
The method returns a callback method that processes the data in chunks. You can listen to the data event to intercept the incoming chunk.
https.get('https://jsonplaceholder.typicode.com/todos/1', (res) => {

  console.log('res.statusCode :>> ', res.statusCode); // 200
  let responseBody;

  // Just like above, data arrives in chunks
  res.on('data', (incomingData) => {
    responseBody += incomingData;
  });
And then you subscribe to the end event to grab the whole JSON data.
https.get('https://jsonplaceholder.typicode.com/todos/1', (res) => {

  console.log('res.statusCode :>> ', res.statusCode); // 200
  let responseBody;

  // data arrives in chunks
  res.on('data', (incomingData) => {
    responseBody += incomingData;
  });

  res.on('end', () => {
    console.log('responseBody :>> ', responseBody); // {...}
  })
});
POST
Alternatively, you can use http.request() method to perform GET requests or other HTTP method requests, as you’ll see now.
I updated the server so that it reads incoming data and then sends that same data back to the client:
const http = require('http');

const server = http.createServer((req, res) => {

  const bodyStream = [];

  req
    .on('data', (chunk) => {
      bodyStream.push(chunk);
    })
    .on('end', () => {
      const bufferData = Buffer.concat(bodyStream);
      const requestBody =  JSON.parse(bufferData);

      console.log('req.headers :>> ', req.headers);

      res.writeHead(201, { 'Content-Type': 'application/json' });
      res.end(JSON.stringify(requestBody));
    });

});

server.listen(3000, () => {
  console.log('Server started on localhost:3000!');
})
Setting up the POST Request
First, we import the HTTP module and prepare the data we want to send.
const http = require('http');

const user = {
  name: 'Super Mario',
  level: 94,
  job: 'Plumber'
};

const data = JSON.stringify(user);
I also included the Authorization token which is base64-encoded for security reasons:
const TOKEN = Buffer.from('TOKEN-12345').toString('base64')Now we set up the options for the POST request:
const options = {
  hostname: 'localhost',
  port: 3000,
  path: '/',
  method: 'POST', // you can change this to GET/POST/PUT/PATCH/DELETE
  headers: {
    'Content-Type': 'application/json',
    'Content-Length': data.length,
    'X-Authorization': TOKEN
  }
}
Then create a request object (using http.request()). The http.request() method takes two arguments, request options (defined above) and a callback function that handles the response.
const request = http.request(
  options, (response) => {
  console.log('Response Status Code :>> ', response.statusCode);

  response.on('data', (chunk) => {
    console.log(`Data arrived: ${chunk.toString()}`);
  });

  response.on('error', (err) => {
    console.log('Response error :>> ', err);
  })

});
Finally, you send the data using the request object:
request.write(data);

// last step
request.end();
If you run the client file, while the server is running, you should see the response printing in the console:
// Server console:
req.headers :>>  {
  'content-type': 'application/json',
  'content-length': '49',
  'x-authorization': 'VE9LRU4tMTIzNDU=',
  host: 'localhost:3000',
  connection: 'close'
}

// Client console:
Response Status Code :>>  201
Data arrived: {"name":"Super Mario","level":94,"job":"Plumber"}
You can find the full code here.
An important thing to mention is that the API communication can also be done using the Fetch API that is added into Node.js in recent years.
fetch("https://jsonplaceholder.typicode.com/todos/1")
  .then((res) => {
    console.log('res.status :>> ', res.status); // 200
    // Process response as JSON
    return res.json();
  })
  .then((jsonData) => {
    console.log('jsonData :>> ', jsonData); // {...}
  })
  .catch(function (err) {
    console.log("Unable to fetch: ", err);
  });
Fetch is a global object and does not need to be imported.
Wrapping up
The HTTP module provides the underlying technology to run HTTP servers in Node.js. It’s fast, but also very primitive, so I suggest using popular frameworks, like Express, Nest.js, Hapi.js, or similar in a real-world production application.
As for the HTTPS module, it can work along existing frameworks (e.g. Express.js) to run a server on a secure port.
If you want to see more stories like this, or stories on Angular, Rx.js, C#, or AWS, be sure to hit the follow button.
I’ll see you in 2024! 👋